Contact us for a FREE consultation! 847-708-6987 ace@sumppumpmedic.com
Pump Testing & Self-Service Schedule
We recommend home owners self-test all your sump pump equipment 3-4 times a year to help ensure proper function and use. The Best time to do this is during a heavy storm event, so you can see how well the pump is working against the amount of rain that’s present, and you don’t have to carry pails of water or artificially fill it using a garden hose.
- Start by removing the sump pump cover to gain access and confirm water is entering from the drain tile, or place a garden hose into pit basin to increase the water level to help run the sump pump equipment.
- Confirm that the sump pump is turning on/off, which means the pumps switch is OK and the sump pump is operating normally. We suggest you watch and confirm the sump pump’s operation for at least 5-6 cycles, just to ensure all is ok and there are no inconsistencies with the sump pump operation.
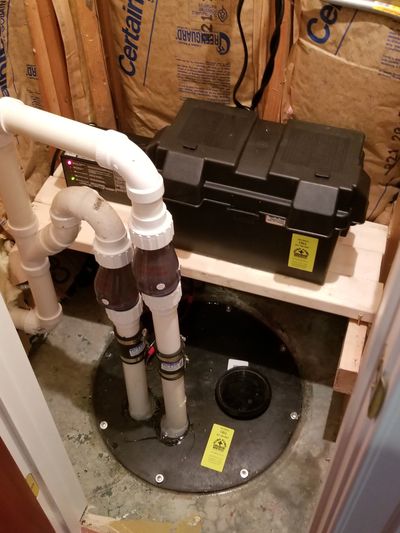
- To make certain the sump pumps check valve is working, a simple step would be to hold the outside of the valve itself as the pump is operating and when the sump pump stops running, you should feel a thump inside the valve as the water has settled inside. This would confirm that the flapper valve inside the check valve itself is present and OK.
- You can remove the check valve for a more detailed inspection. (Be sure to unplug the pump first!)
- Once the check valve has been removed, place water in the top side of the check valve. No water should be running through it!
When water is running through the check valve, the flapper valve inside is warped, defective or missing. Or perhaps there are small stones caught under the flapper valve, in which case you can remove them and try to re-use the check valve.
- However, if the valve does not pass the above testing method, remove the defective check valve and install a new one. We prefer to use a clear, silent type check valve due to the noises related to their use in service, and the check valve is clear so the presence of small stones are obvious.
When a defective check valve is in operation or use, you may notice excessive pump activity, cycling often regardless of the amount of rain. This is due to the check valve water continually falling back into the pit basin, forcing the pump to cycle again.
- Finally, in self testing your sump pump equipment, you want to make sure the sump pump vent is clear. This is a very small hole in the sump pump body or casing, usually at the lower portion of the sump pump itself.
The vent allows air caught under the sump pump by the pump’s impeller to be released effectively when the sump pump needs to operate. If clogged or restricted, the sump pump will not operate properly.
- To discharge all of the water and reveal the vent hole, lift up and hold the sump pump switch, or separate the two plugs and plug in the sump pump manually (the normal looking plug, NOT the one in which a plug outlet is at the back end). You should see a small fine single stream of water streaming outward from the pump near the bottom. The water is gone!
- Unplug the pump from wall outlet. Once the pump has stopped running, you may hear an air gasping noise as well. The sump pump vent is clear and OK.
Taking these steps will ensure your sump pump equipment can operate when needed. Also, you become familiar with how it operates, and if something is defective or wrong, you will know well in advance -- prior to needing it and having the equipment fail, resulting in flood damage!
If there is a secondary pump, perform all of the above tests for it as well. Battery back-up pump systems should be tested as well. (Unplug the battery charger, requesting the battery to be used.)
We recommend the same above testing schedule 3-4 times a year, along with a yearly inspection and maintenance service visit to assess and check over-all pump equipment.

We will match or beat our local competitors written estimates, so call or email for a free consultation and evaluation today!
847-708-6987
Copyright © 2024 Sump Pump Medic - All Rights Reserved.
This website uses cookies.
We use cookies to analyze website traffic and optimize your website experience. By accepting our use of cookies, your data will be aggregated with all other user data.